A commercial kneader turns separately weighed ingredients into a developed dough through controlled loading, hydration, mixing, kneading, temperature checks and discharge. By following the sequence, you can identify what each machine part does, judge the dough endpoint, and specify a machine that will handle your recipe without overheating or mixing unevenly.
Key takeaways
- The gearbox multiplies torque for stiff, low-hydration dough.
- Add flour, water and other ingredients in the maker’s recommended order.
- Control water temperature and dough temperature, not mixing time alone.
- Inspect dough strength and consistency before discharging the batch.
What happens inside the kneader when the drive starts?
Motor torque reaches the kneading tool through the drive coupling and gearbox, not directly from the motor shaft. The gearbox reduces speed and multiplies torque so the tool can move stiff, low-hydration dough without relying on motor power alone.
Key parts in this transmission and mixing path are:
- Motor: supplies rotational energy.
- Gearbox: converts speed into usable torque.
- Coupling and shaft: carry torque to the tool.
- Bowl or trough: contains the ingredients and provides resistance.
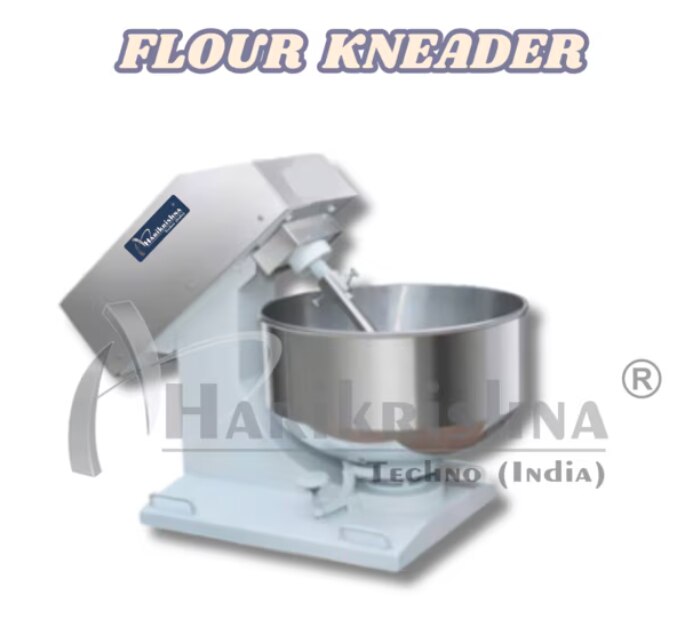
- Kneading arm or spiral: applies force to the developing dough.
- Frame and control panel: support the drive and regulate operation.
- Lid, guard and interlock: prevent access to moving parts.
At startup, the tool first drags flour and other ingredients through the bowl. As water hydrates the flour, the mass changes from loose particles into a sticky dough that resists movement.
The tool repeatedly folds, stretches, compresses and shears it against the bowl or trough; this mechanical work joins hydrated gluten-forming proteins into a continuous dough structure.
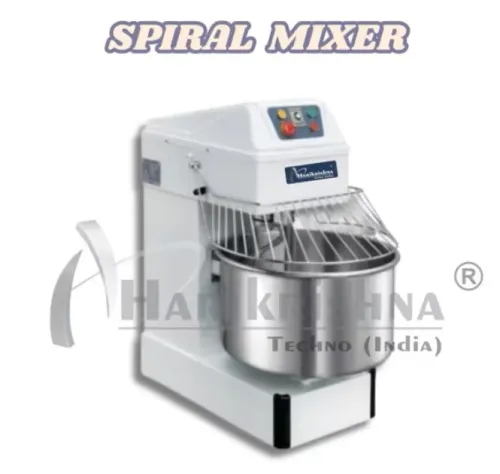
A spiral kneader usually works with a spiral tool and bowl, while a horizontal machine uses Z-arms or similar opposing tools. Tool geometry, speed and bowl movement alter the result, so motor kilowatts alone do not describe commercial dough kneader working. Overload protection and controlled restart matter because resistance rises sharply when the dough tightens.
How do you load ingredients and begin the flour kneading cycle?
Begin with a weighed recipe, not a running motor. The flour kneading machine process depends on accurate flour, water, yeast, salt, fat, sugar and minor-ingredient weights; adjust water temperature to reach the target final dough temperature after allowing for flour, room temperature and machine friction.
1. Confirm the batch falls between the maker’s stated minimum and maximum load. Rated bowl volume is not usable dough capacity, and a stiff, oversized batch can stall the gearbox or trip the motor overload.
2. Fit the bowl or trough, install the specified kneading tool, and check that the shaft, scraper and discharge parts are clear. Add ingredients in the recipe’s sequence, keeping liquids controlled so dry flour pockets and flour dust do not form.
3. Close the lid or guard and engage every bowl lock and safety interlock. Reset the emergency stop, keep hands and tools outside the chamber, and verify that the discharge gate is shut.
4. Start at the prescribed low speed so the flour absorbs liquid without throwing ingredients or smearing the dough across the vessel. Increase to the development speed only after incorporation is uniform.
5. Watch the dough and machine together: listen for abnormal gearbox noise, check for excessive vibration or overload indication, and stop if the tool labours. That is the practical answer to “how does a commercial flour kneading machine for work?” Torque must be applied to a controlled, correctly loaded batch, not an overfilled bowl.
How do hydration, temperature and kneading endpoint change the result?
Water determines dough consistency before the machine develops gluten. Calculate it as: flour weight × hydration percentage. For 100 kg of flour at 60% hydration, add 60 kg of water, then subtract liquid supplied by milk, eggs or other ingredients. Adjust after a small trial: dry seams need more water; slack dough needs less.
1. Set a target final dough temperature from the recipe. Choose water temperature with this practical balance: target dough temperature × 3, minus flour temperature, room temperature and the mixer’s friction contribution.
Record the result from previous batches; high speed, heavy loads and worn tooling add heat, so chilled water or a shorter cycle may be necessary.
2. Start slowly to wet flour evenly and limit dusting. Move to the faster development speed only after no dry pockets remain. The correct speeds depend on tool geometry, dough type and batch size, so flour kneader machine operation should follow dough condition rather than a fixed “ten-minute” rule.
3. Stop for inspection when the dough gathers into a cohesive mass. Under-kneaded dough looks rough, tears quickly and fails a small stretch or windowpane test.
4. Continue only until the dough is smooth, elastic and extensible, with resistance but no immediate tearing. Overworked dough becomes excessively warm, sticky or shiny, then loses strength and turns slack; continued mixing will not repair it.
Temperature, feel and stretch together identify the endpoint more reliably than elapsed time alone.
How do you stop, inspect and discharge the finished dough?
Stop the drive at the endpoint, wait until the kneading tool has completely stopped, and isolate power before reaching into the bowl or trough. In commercial dough kneader working, discharge is part of the production cycle, not a housekeeping task added later.
1. Stop the drive from the control panel, allow the tool to coast to a complete stop, and apply lockout/tagout before manual removal or cleaning. Do not rely on the stop button alone.
2. Open the lid or guard only after hazardous motion has stopped. Test the guard interlock during commissioning and routine checks: opening it must prevent or stop tool movement, and the machine must not restart after power returns.
3. Remove the dough with a suitable scraper, or use the bowl-tilt or discharge system if fitted. Keep hands away from pinch points between the tool, bowl and frame.
4. Inspect the empty bowl and tool before washing. Remove retained dough from shaft interfaces, seals, scraper gaps and weld seams; residue in these areas can support microbial growth and contaminate the next batch.
Cleaning access must let you see and reach every food-contact surface without dismantling unsafe parts. Check that guards, hinges, interlocks and discharge controls function before the next recipe; a failed interlock or hidden residue makes the kneader unsafe and unsanitary.
What should you test before choosing a commercial flour kneader?
Test the machine against your hardest recipe, not its empty-bowl capacity or motor rating alone. Tool geometry determines how force enters the dough: a spiral folds and stretches, a planetary tool orbits while rotating, and horizontal Z-arms compress and shear.
| Architecture | Tool action | Best comparison |
|---|---|---|
| Spiral kneader | Spiral with fixed or rotating bowl | Dough type, bowl speed and torque |
| Planetary mixer | Tool rotates and orbits | Attachment, speed range and batch size |
| Horizontal kneader | Opposing or intermeshing arms | Stiff dough, discharge and cleaning access |
Ask for the manufacturer’s minimum and maximum flour loads, usable dough weight, hydration range and motor-current limit. A full bowl can still stall or heat the gearbox when stiff dough exceeds the tool’s torque capacity.
Confirm low and high speeds, timed stages, reverse or jog controls, emergency stop, lid interlock and overload protection that stops the drive without damaging the batch.
Inspect 304 stainless steel on every food-contact surface, continuous welds, rounded corners, drainable bowl or trough, accessible shaft seals and tool removal. Crevices turn into sanitation failures.
Witness the flour kneader machine operation using your flour, recipe, hydration, batch size and target dough temperature. Record speed stages, cycle time, current or overload response, dough uniformity, final temperature, discharge time and cleaning access. A high-hydration demonstration proves little about stiff dough.
When searching for a flour kneading machine manufacturer in Rajkot, HARIKRISHNA TECHNO (INDIA) should receive those specifications, plus your electrical supply, washdown limits and spare-parts requirements.
Related products
 | FLOUR KNEADING MACHINE Our Flour Kneading Machine is designed for efficient and consistent dough preparation. View product → |
 | FLOUR KNEADING MACHINE This L-Type Flour Kneading Machine is designed for efficient and consistent dough preparation, with a specialized function for besan products. View product → |
Frequently asked questions
What happens inside a commercial flour kneader when the drive starts?
The motor transfers torque through a coupling to a gearbox. The gearbox reduces speed and increases torque before turning the kneading tool through the dough.
How do you load ingredients into a commercial flour kneading machine?
Check the rated batch size, add ingredients in the specified order, secure the guard or lid, and start the cycle at the correct speed.
How do hydration and temperature affect the kneading result?
Hydration changes dough stiffness and mixing demand, while ingredient and dough temperature affect development, fermentation rate and final consistency.
How do you know when the kneading cycle is finished?
Stop the machine and inspect the dough for uniform hydration, cohesive structure and the texture required by your recipe rather than relying only on elapsed time.
What should you test before choosing a commercial flour kneader?
Test the machine with your flour, hydration, batch size and recipe. Check torque, temperature rise, mixing uniformity, discharge access, cleaning and safety controls.
Related product
 | FLOUR KNEADING MACHINE Spiral Mixer The Spiral Mixer is an essential machine for dough preparation, designed for efficiency and durability. View product → |
Keywords